Watch folder image uploader
Watch Folder Upload Images
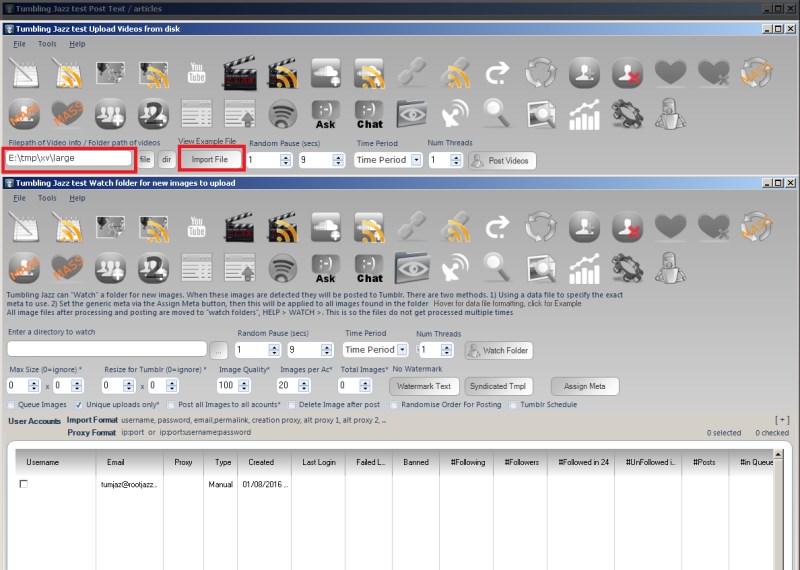
The watch folder module, allows you to to specify a folder to watch, as soon as an image is added to that folder, it will be uploaded to tumblr. This is a great way to keep your blogs up to date if you run external scrapers without having to keep creating new actions to upload images.
There are two ways in which images can be detected to be uploaded
- the image itself
- a meta file
The Image Itself
This one is quite obvious, the program detects a file in the folder and uploads it setting the meta from the tokenised meta system.
The meta data is set by clicking the Assign Meta button and using the standard Meta form
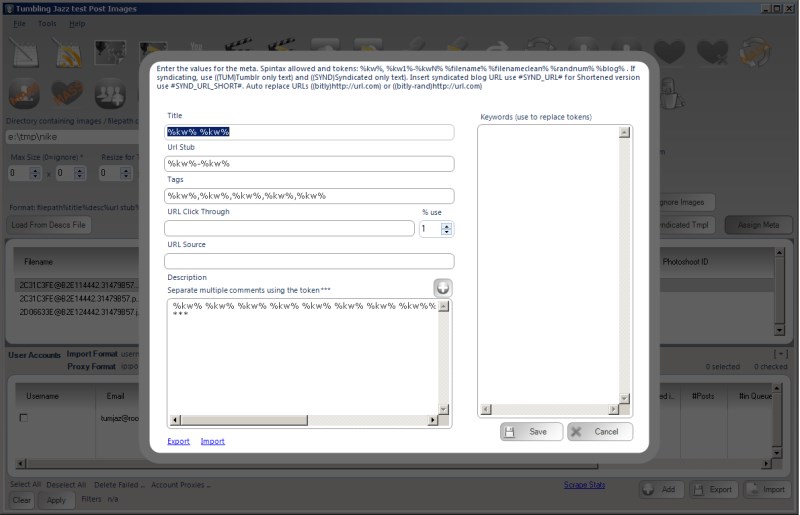
The Assign Meta form allows you to specify randomised Tags and Description for your post. The control is a TumJazz standard keyword token form you will use throughout the program and will allow spintax and tokens to be used for all values.
The inputs on the left are your meta values and the list input on the right is for your keywords. The meta inputs all can take the %kw% token. This token will be replaced by a random keyword that you specify in the keywords box on the right (one keyword per line). Additionally, for more control of what keywords to use, you can also use tokens %kw1% %kw2% and those specific keywords will be replaced
A Meta File
TumJazz can detect meta files, the meta file is used to specify the image to upload and the meta data to assign to the image.
The file should be formatted as:
#The data file should be formatted:
Img filepath
Title
Desc
Url stub
Tags
Click through
Source

#eg
c:\images\upload\tumblr\img.jpg
Another beautiful day sunset
A beautiful sunset capture on the train heading home from a long day at work
beautiful-sunset
sunset,beautiful,nature
`<http://flickr.com/sunsetpics>`_
`<http://flickr.com/sunsetpics>`_ /album/1/collection/2a
To create a watch action, the first thing to do is specify your folder to watch. The options for this module correspond to the upload images module. The only differences are:
Post All Images To All Accounts
If selected and multiple accounts assigned to the watch folder, all accounts will upload the same image. If unchecked, the images will be uploaded by a single account where the accounts are used in sequence.
Images Per Acc
How many images per day can an account upload
Total Images
How many images can the action upload per day (combined count of all accounts)
Upload Image Settings
Standard Search Action Parameters
Random Pause:
Specify a minimum and maximum value, after actioning an item the action will pause for a random amount between the specified minimum and maximum values.
Max Actions / Max items:
The number of items to process within the action.
Fluctuate +-:
If you are repeating your action, you may not want to action on the the same number of items each action (avoiding footprints, so you can fluctuate the number of items to perform. If you specify 100 Max Actions and a Fluctuate value of 10. Then your action will random perform 90-110 items (100 +/- 10)
Time period:
The time period control will pre-populate the random pause values based on the MAX ACTIONS value that will be calculated at actioning the items evenly over the specified time period. For example, specify the action to have a Max Actions value of 100 and set Time Period to 1 day. That means, do 100 items over 24 hours, thus the random pause will be calculated at 864 seconds.
Repeat Hours + after checkbox:
Once the action has completed, wait the specified hours then repeat. Set it to 24 to repeat every day, set it to 12 to repeat twice a day etc. The checkbox "after" means the time is added on after the action completes. Unchecking the option means it is added on to when the action starts. So if the action starts at 0900 and completes at 0930. If your repeat hours value is 1, then with after checked the action starts again at 1030 (1 hour after it completed, with after NOT checked, the action repeats at 1000, an hour after it started
Schedule / Daily Runner
Using the schedule control you can specify when your action should run. The other scheduling option is Daily Runner. This will make sure the action runs at the same time every day. eg. Daily Runner 2pm. At 2pm (14:00) the action will start, then on completion schedule itself for 2pm / 1400 the next day
Unique Items Per Account / Action once
This option will ensure you do not reprocess the same items. So if you are performing a follow action, once you have followed an account you will never follow that account again, even if you have unfollowed them since. This also works for items processed by other accounts within a Share across accounts action and any items logged in a global processed log (for information on global processed logs, please see the revelevant section)
Watermark Text
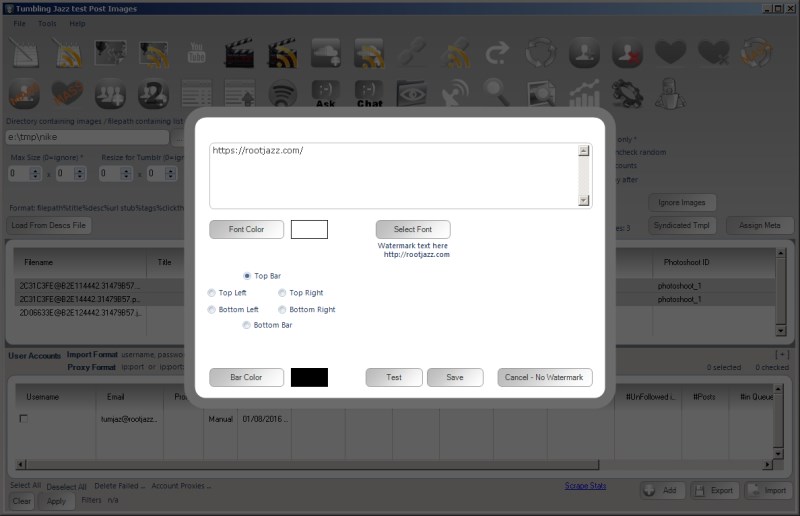
When uploading an image, you can specify text to be written onto the image. The text can be written to any of the 4 corners, or a bar can be added to the top or bottom of the image and the text written in the bar.
Max Size
You can specify the maximum dimension of the image to upload, any images that contain a dimension over this will be resized automatically. Applied to images posted to tumblr and any syndicated images. More information on syndication in the syndication section
Resized for Tumblr
You can specify the dimensions of the image to post to Tumblr. Any image larger than this will be automatically resized. This setting is similar ot the Max Size option, however it is different if you are Syndicating your image to wordpress / blogger this value is only applied to the image when posted to tumblr, the full size image will be syndicated. More information on syndication in the syndication section
Image Quality
You can reduce the quality of the image when posting to Tumblr
Tumblr Schedule
Check this option and your post will be sent to Tumblr straight away, but it will be scheduled by Tumblr to post at the specified time. Unchecked and the action will be scheduled to run in TumJazz at the specified time
Queue Images
Your images will be queued by Tumblr and dripped to your blog based on your Tumblr Queue settings (these can be edited via the Update Accounts tab in TumJazz
Alphabetical / Unchecked Random
Check this option to upload your images alphabetically, unchecked and the order is random
Unique Uploads Only
Ensure you do not upload the same image twice
Delete Local Image After
Check this option and the image on your local hard drive will be deleted after it is uploaded. After the image is deleted there is no getting it back so make sure you really mean to delete it before checking this
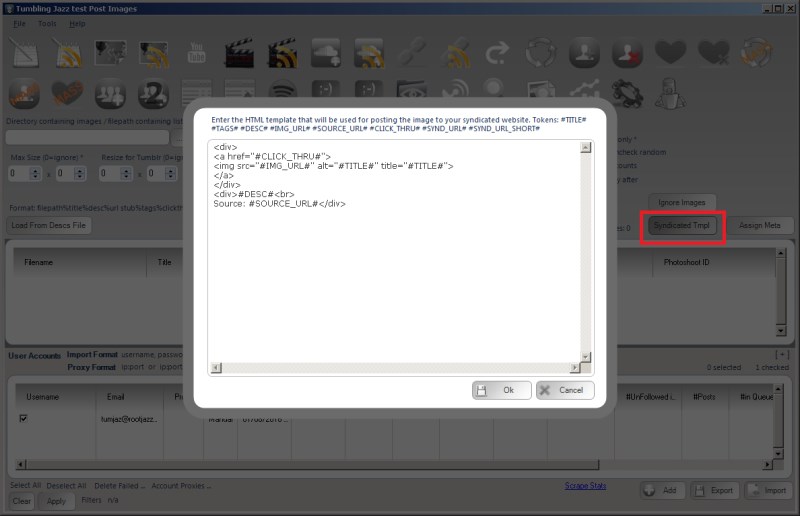
Syndicated Template
If you are syndicating your content, you can specify an HTML posting template on how your post will be created on your syndicated blog.