Image Repost
Image Repost
General search information on the General search and action page
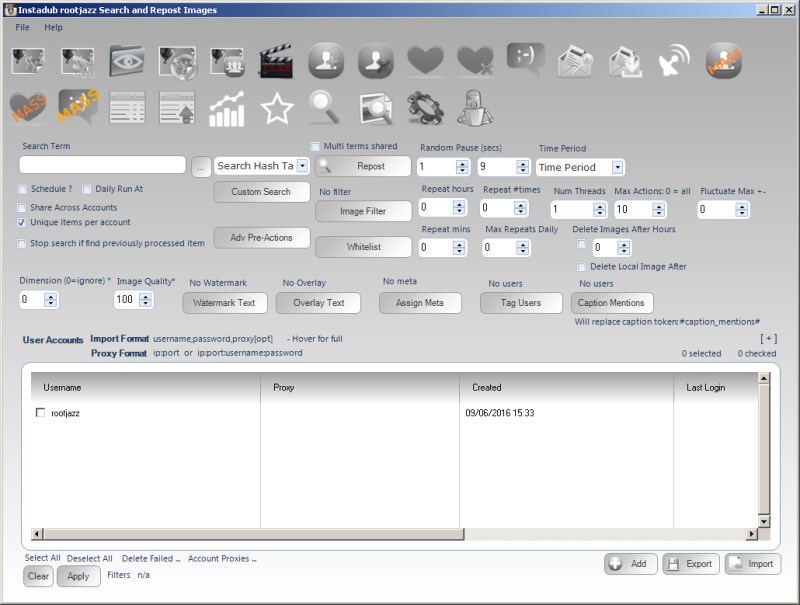
Image reposting is where you search for images on Instagram, download them then upload them to your Instagram account. As with all image uploading modules, you can add a watermark, you can overlay text over the full image, you can tag users, mention users etc etc
Specifying the images to repost is done via the standard InstaDUB search controls. More information on this in the Search Actions section, but you can select a predefined search from the dropdown control, or build a Custom Search. Additionally, you can enter a filepath of pre-defined images to repost. To specify a list of images to repost, you need to create a text file and specify each image, one per line. You can specify the image via the IMAGE ID (preferred) or the URL.
As with all search modules, there is a FILTER option, which allows you to specify certain parameters that must be met in order to action on the image. This can be values relating to the image or the account that posted the image
Adv Pre Actions
Pre actions are actions you perform on the account or image before performing the main action. For example you can specify to follow the account before reposting the image, you can specify to like the 4 most recent images of the account before. For more information on Adv Pre-Actions, please see that section.
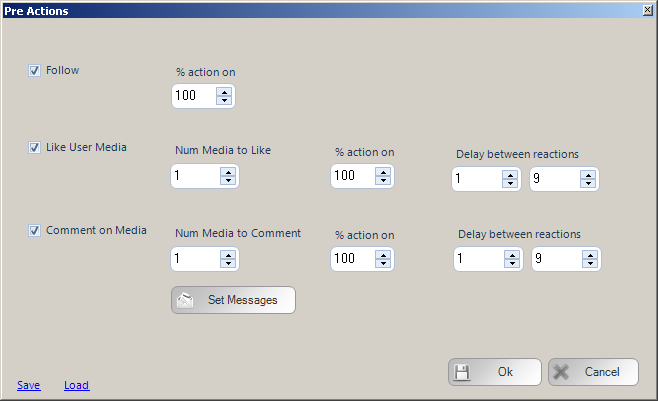
The three pre actions that are possible are:
* Follow
* Like
* Comment
For like and comments, you can specify to process more than 1 item. Selecting 5, will mean you like the 5 most recent images of the user.
% action on
To avoid the footprint of always performing the same pre-actions, you can specify a % to action on. Lets say you specified to Like 5 images in pre action and set the %action on to 50%. This means, you will action on 50% of the images. Do note, each item is tested for a 50% probability, think of it is rolling a dice. Should this item be actioned on? If I roll a 1,2,3 I will action on the item, if I roll a 4,5,6 I will not. This gives more randomness (randomness is good) but does mean, overall you will not action on 50% of items. Just like when rolling a dice, you could roll a 1, 2, 5, 2, 3. Which would mean you action on 4 out of the 5 items. But that's the way the dice rolls...
As we are potentially performing more actions, the option exists to pause after each pre-action. Use it.
Pre Action Comments.
If you are performing pre action comments, you will need to set your comments, so click the COMMENTS button to view the comment loader control
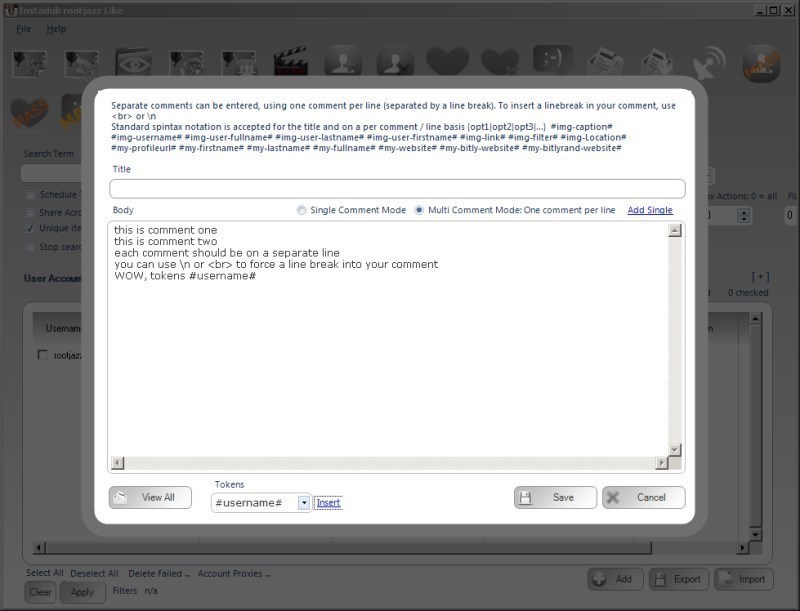
Enter your comments ONE PER LINE, each line is a separate comment. Your comments will be posted in sequence. For more help on using the multi comment control, look at that section.
Comment Tokens
To insert tokens into your comment, use the token control at the bottom of the form, select the token you want to use, then click INSERT to insert it
NOTE
Posting the same comment is spamming. You will annoy users. You will get blocked. You will probably get banned. DON'T BE ANNOYING. Use multiple comments, use tokens, use spintax
Standard Search Action Parameters
Random Pause:
Specify a minimum and maximum value, after actioning an item the action will pause for a random amount between the specified minimum and maximum values.
Max Actions / Max items:
The number of items to process within the action.
Fluctuate +-:
If you are repeating your action, you may not want to action on the the same number of items each action (avoiding footprints, so you can fluctuate the number of items to perform. If you specify 100 Max Actions and a Fluctuate value of 10. Then your action will random perform 90-110 items (100 +/- 10)
Time period:
The time period control will pre-populate the random pause values based on the MAX ACTIONS value that will be calculated at actioning the items evenly over the specified time period. For example, specify the action to have a Max Actions value of 100 and set Time Period to 1 day. That means, do 100 items over 24 hours, thus the random pause will be calculated at 864 seconds.
Repeat Hours:
Once the action has completed, wait the specified hours then repeat. Set it to 24 to repeat every day, set it to 12 to repeat twice a day etc
Repeat Mins:
The same as hours, but minutes, a finer grained control of how to repeat your action
Repeat # times:
The action will only repeat the specified number of times. For example, repeat every 24 hours (once a day), Repeat #Times = 7, thus repeat every day for a week then stop and do not repeat any more.
Max Repeats Daily:
This value will limit the number of repeats your action can do in a 24 hour period. Perhaps you are waiting to repeat your action in quick succession during certain hours, perhaps you want to repeat your action every 15 minutes between the hours of 1700 and 2000. Thus you can specify to repeat your action every 15 minutes with a Max Repeats Daily of 12 (1700,1715,1730,1745,1800,1815,1830,1845,1900,1915,1930,1945)
Schedule / Daily Runner
Using the schedule control you can specify when your action should run. The other scheduling option is Daily Runner. This will make sure the action runs at the same time every day. eg. Daily Runner 2pm. At 2pm (14:00) the action will start, then on completion schedule itself for 2pm / 1400 the next day
Unique Items Per Account
This option will ensure you do not reprocess the same items. So if you are performing a follow action, once you have followed an account you will never follow that account again, even if you have unfollowed them since. This also works for items processed by other accounts within a Share across accounts action and any items logged in a global processed log (for information on global processed logs, please see the revelevant section) Delete Image After: ------------------------------------------------------------------------------------------ If you want to have your image removed from Instagram after a specified time period this is the control to do it. Check the box and specify the hours to wait before deleting the image. Once the image is uploaded anew action will be created to delete the image at the specified time period. Note, in order to delete the image InstaDUB and your computer must be running.
Delete Local Image After:
After uploading the image, delete the image from your local hard drive.
User Tags / User mentions
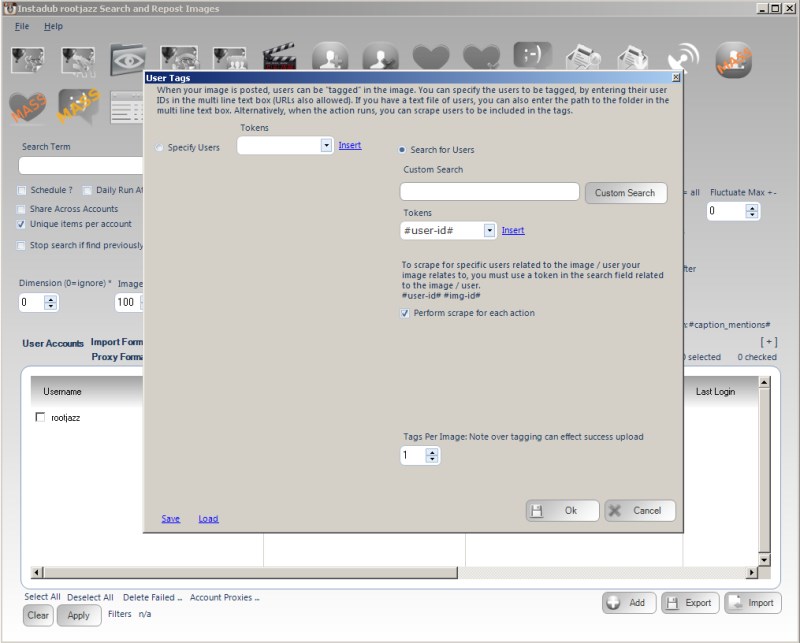
As detailed previously, InstaDUB can tag users in your images and add user mentions to the caption. However, now we can also perform a search based on the image being reposted. Using one of the tokens #img-id# #user-id# as the input for your search. This allows you to build a custom search where you are going to tag 10 followers of the user who posted the image! Or perhaps you want to mention 8 users who have liked / commented on the original image! They interact with the image / account once, hopefully they will now interact with your account. Don't forget to do this you must check the option Perform Scrape for each action
Text Overlay
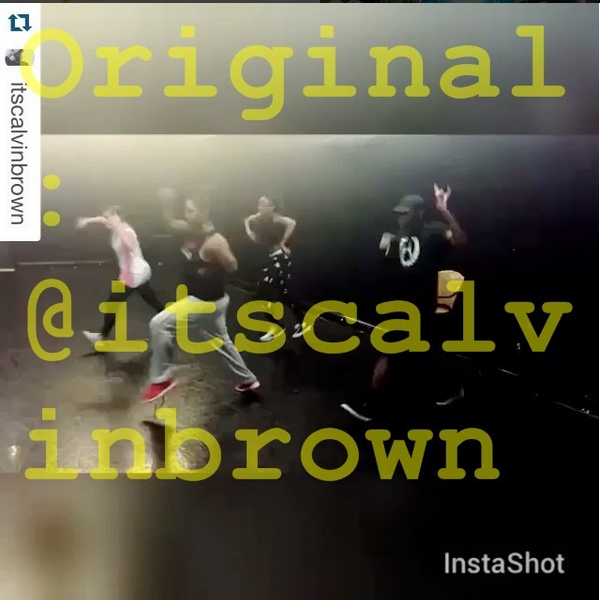
The text overlay function lets you write text completely over the image, as above the overlay text is
Original: @itscalvinbrown
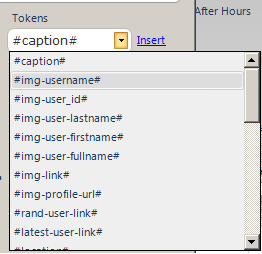
When specifying the text overlay, you have the following options:
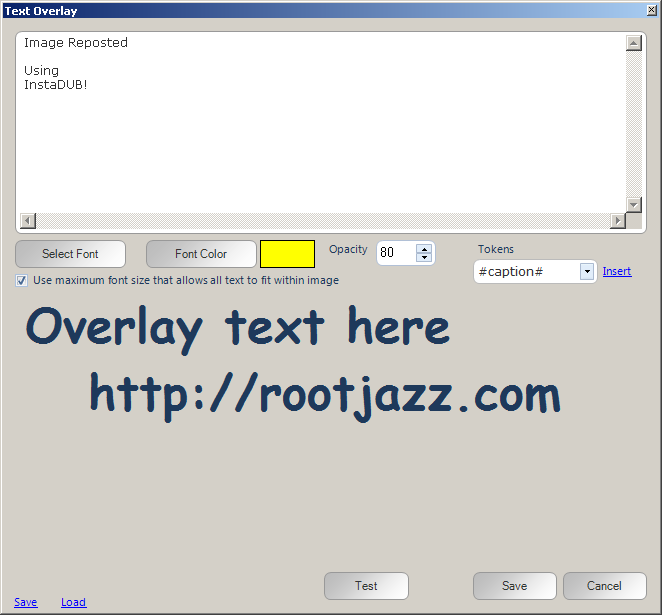
- The actual text you want to overlay. As always there are a selection of tokens you can use, ready to be input via the tokens control,
- just select the token you want and click insert
Font
You can specify the font to use, along with styling and size.
Use maximum font size that allows all text to fit within image. This option will override the specified font size and automatically try and work out the maximum allowed font that will your text into the image.
When entering your text to overlay, the lines breaks that you enter will try to be adhered to. For example, it is easier to fit the following text within an image
Original
image by
#img-user#

Reposted by
#my-username#
and harder to to try and fit the text into the image if it is specified as:
Original image by#img-user#
Reposted by #my-username#
This is because ISG images are square, opposed to landscape, so do be aware of how you specify the text and how it will appear in the image
Opacity
This value will make your text transparent, with a value of 0 being completely see through and 100 being fully visible.
Save / Load
As always, we try and give you a way to save and reload previous settings to make your life as easy as possible. Save your current overlay settings and reload in previously saved settings.
Test
Select an image and see how the overlay text looks!